Creating Expenses
After uploading a receipt, you'll create an expense record. You can also create expenses manually without a receipt.
From a Receipt Upload
After OCR processes your receipt:
- Review the extracted data (merchant, amount, date)
- Select a category from the dropdown
- Add notes describing the business purpose (optional but recommended)
- Click Save as Draft or Submit
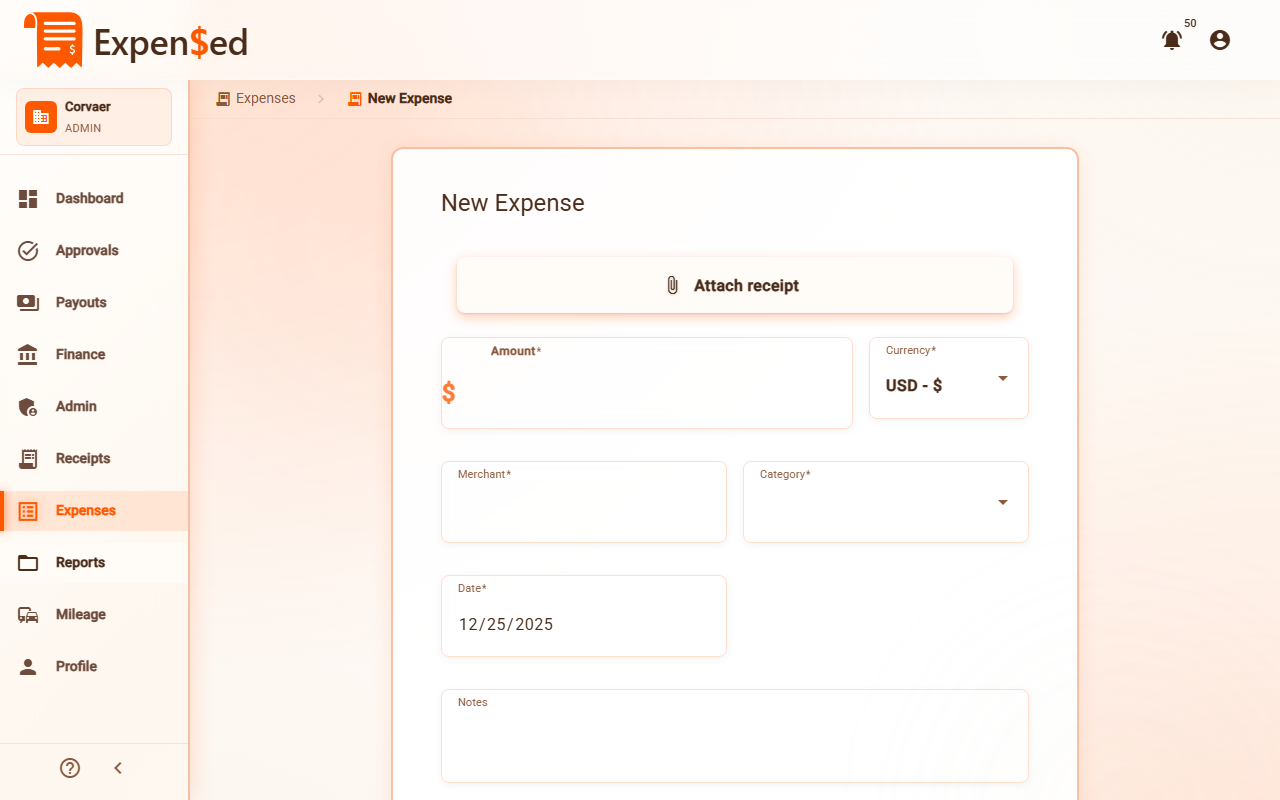
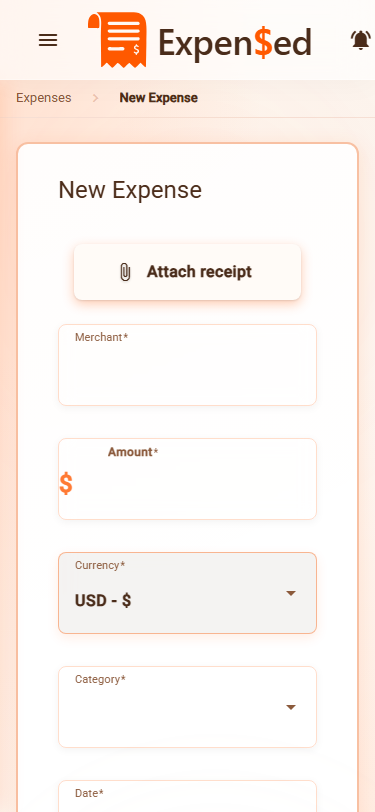
Manual Expense Entry
To create an expense without uploading a receipt first:
- Go to Expenses in the sidebar
- Click New Expense
- Fill in the required fields:
- Merchant - Where you made the purchase
- Amount - How much you spent
- Date - When the purchase was made
- Category - Type of expense
- Optionally add a receipt later
- Click Save as Draft or Submit
Expense Form Fields
Here's what each field means:
| Field | Required | Description |
|---|---|---|
| Merchant | Yes | The store, restaurant, or vendor name |
| Amount | Yes | Total amount paid (including tax) |
| Date | Yes | Date of the transaction |
| Category | Yes | Type of expense (see Categories) |
| Notes | No | Business purpose or additional details |
| Receipt | Depends | May be required by your organization's policy |
| GL Code | No | General ledger code for accounting (if enabled) |
| Cost Center | No | Department or project code (if enabled) |
Adding Receipts to an Expense
You can attach multiple receipts to a single expense:
- In the expense form, click Add Receipt
- Upload the receipt file
- The receipt is attached and OCR runs (but won't overwrite your data)
- Repeat for additional receipts
Multiple Receipts Example
A hotel stay might have:
- Room charge receipt
- Parking receipt
- Room service receipt
Attach all three to a single "Lodging" expense.
Save as Draft vs. Submit
You have two options when saving an expense:
Save as Draft
- Saves the expense to your account
- Does not send for approval
- You can edit it later
- Useful for incomplete expenses
Submit
- Saves and sends for approval immediately
- Your manager will see it in their queue
- You can only make limited edits after submitting
- Status changes to "Submitted"
When to Use Drafts
Save as draft if:
- You're missing information
- You want to group it with other expenses in a report
- You're not ready to submit yet
Editing Expenses
Editing a Draft
Draft expenses can be fully edited:
- Go to Expenses
- Find the expense (status: Draft)
- Click to open it
- Make your changes
- Click Save or Submit
Editing a Submitted Expense
Once submitted, you can only edit:
- Notes
- GL Code / Cost Center
To change other fields, you'll need to ask your manager to reject it so you can resubmit.
Deleting Expenses
You can only delete draft expenses:
- Go to Expenses
- Find the draft expense
- Click the three-dot menu (⋮)
- Select Delete
- Confirm the deletion
Cannot Delete Submitted Expenses
Once an expense is submitted, it cannot be deleted. Contact your manager to reject it if you need to remove it.
Splitting an Expense
Sometimes a single receipt covers multiple categories. For example, a shopping trip might include both office supplies and client gifts. Use the split expense feature to divide the amount across categories.
How to Split an Expense
- Create or open an expense
- Click Split Expense below the amount field
- In the split dialog:
- Add line items for each category
- Enter the amount for each line
- Optionally add descriptions
- The total of all splits must equal the original amount
- Click Apply Split
Split Expense Example
Original receipt: $150 at Office Depot
- Office Supplies: $75 (printer paper, pens)
- Client Gifts: $50 (gift basket)
- Equipment: $25 (USB cables)
Each split line item can have its own category and GL code, but they all share the same receipt.
Viewing Split Expenses
Split expenses show a icon in the expense list. Click to see all line items and their breakdown.
Duplicate Detection
Expensed automatically checks for potential duplicate expenses to prevent double submissions.
When You'll See a Warning
A duplicate warning appears when you create an expense that matches:
- Same merchant (or similar name)
- Same amount (within $0.50)
- Same date (or within 1 day)
What to Do
When you see a duplicate warning:
- Review the existing expense - Click the link to open it
- If it's truly a duplicate - Cancel creating this expense
- If it's a different purchase - Click Continue Anyway to save
Common Duplicate Scenarios
Actually duplicates:
- Accidentally uploading the same receipt twice
- Creating an expense you already submitted
Not duplicates (continue anyway):
- Two separate purchases at the same store on the same day
- Similar amounts for different transactions
Budget Alerts
If your organization uses budget tracking, you'll see alerts when approaching spending limits.
Types of Budget Alerts
| Alert | Meaning |
|---|---|
| Warning (Yellow) | You're approaching the budget limit (80%+ used) |
| Over Budget (Red) | This expense would exceed the budget |
What Happens When Over Budget
Expenses that exceed budgets can still be submitted, but:
- You'll see a clear warning
- The expense is flagged for approvers
- Your manager may request justification
- Additional approval may be required
Budgets Are Informational
Budget alerts don't prevent you from submitting expenses - they're meant to help you and your approvers make informed decisions.
Validation Rules
Expensed validates expenses before saving:
| Validation | Rule |
|---|---|
| Date | Cannot be in the future |
| Amount | Must be greater than $0 |
| Merchant | Required |
| Category | Required |
| Receipt | May be required for amounts over a threshold (set by admin) |
If validation fails, you'll see an error message explaining what needs to be fixed.
Organization Policies
Your organization may have additional rules:
- Maximum amount per category
- Required receipts for expenses over $25
- Blocked vendors
- Daily spending limits
Policy violations are shown during expense creation so you can correct them before submitting.
Next: Expense Categories →